Top Stories
Create a Colorful Outdoor Bench with This DIY Guide
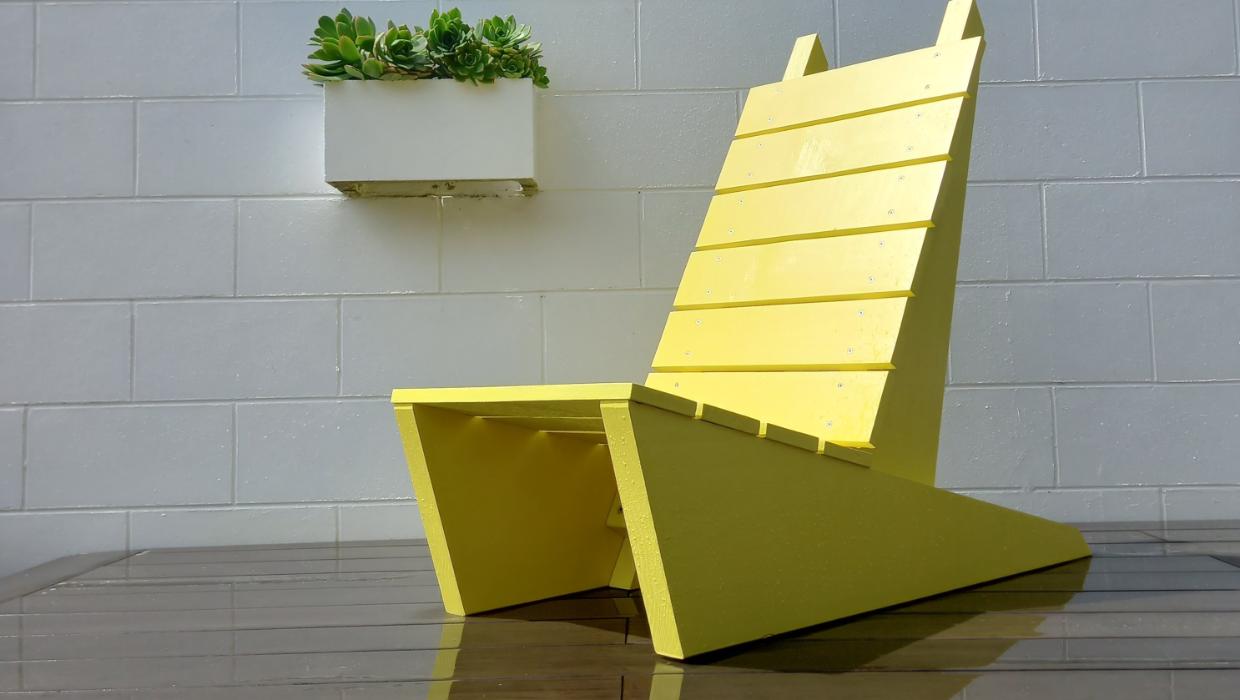
DIY enthusiasts can bring a splash of color to their outdoor spaces with a new project that combines functionality and creativity. Designed by Benjamin Uyeda at Home Made Modern, this simple guide outlines how to build a stylish bench using readily available materials. The project is not only budget-friendly, costing approximately $150 (excluding paint), but also a great way to enhance any garden or patio area.
Materials Needed for Construction
Before diving into the project, gather the necessary materials. You will need:
– Four pieces of 1.2m x 300mm x 50mm exterior timber
– Two pieces of exterior timber measuring 350mm x 90mm x 45mm for the supports
– Slats made from 45mm x 450mm exterior timber or similar
– Eight 75mm bugle screws
– 40mm stainless steel screws
– Sandpaper
– Spacers
– Resene Quick Dry Exterior/Interior Primer along with your color choice from Resene finishes
For this project, the author selected Resene Broom in an exterior semi-gloss finish.
Tools Required
Equipping yourself with the right tools is essential for a successful build. Ensure you have the following tools on hand:
– Measuring tape and pencil
– Steel ruler
– Drop saw
– Skill saw
– Power drill and impactor
– 6mm drill bit and bugle head bit
– 4mm drill bit for 40mm screws
– Paintbrushes and mini rollers
With all materials and tools ready, the project can commence.
Step-by-Step Instructions
The construction process is straightforward, consisting of several key steps:
1. **Cut Diagonals:** Begin by cutting the timber pieces at diagonal angles to ensure a clean fit.
2. **Measure and Cut Again:** Double-check your measurements and make any necessary cuts to achieve the desired dimensions.
3. **Cut Slats, Sand, and Paint:** Prepare the slats by cutting them to size, then sand them down for a smooth finish. Apply the primer and your chosen paint color.
4. **Predrill Holes:** To prevent wood splitting, predrill holes where screws will be inserted.
5. **Attach Supports:** Secure the support pieces to the main structure using the appropriate screws.
6. **Attach Slats:** Finally, fasten the slats onto the bench frame, ensuring they are evenly spaced for a polished look.
This DIY project not only provides a functional piece of outdoor furniture but also allows for personal expression through color and design. Whether you are an experienced DIYer or a beginner, this bench is an excellent way to enhance your outdoor living area. Embrace the challenge and enjoy the satisfaction of creating something beautiful for your home.

Botany Community Patrol Marks 20 Years with Local Town Centre

New Leader Qiulae Wong Targets 150,000 Votes for 2026 Election

Wellington Phoenix Women Held to Draw by Newcastle Jets in A-League Clash

New Zealanders Flee Economic Struggles for Better Opportunities in Australia

Wellington Phoenix Women Draw with Newcastle Jets After Controversial Penalty

Three Winners Share $55 Million Powerball Jackpot in Record Draw

Colin Farrell and Edward Berger Forge Creative Alliance in Macau

Regulating Holiday Drinking: Tips from Naturopath Erin O’Hara

Poetic Reflection on Life and Death Captivates Readers

Test Your Knowledge: Take the Herald’s Afternoon Quiz Today

PM Faces Backlash from Fans During Netball Trophy Ceremony

Dunedin Designers Win Top Award at Hokonui Fashion Event

Liam Lawson Launches New Era for Racing Bulls with Strong Start

Disney Fan Reveals Dress Code Tips for Park Visitors

Walking Faster Offers Major Health Benefits for Older Adults

Coalition Forms to Preserve Māori Wards in Hawke’s Bay

Experience the Excitement of ‘Chief of War’ in Oʻahu

Scots Rally with Humor and Music to Protest Trump’s Visit
-
 World4 months ago
Test Your Knowledge: Take the Herald’s Afternoon Quiz Today
-
 Sports4 months ago
PM Faces Backlash from Fans During Netball Trophy Ceremony
-
 Lifestyle4 months ago
Dunedin Designers Win Top Award at Hokonui Fashion Event
-
 Sports4 months ago
Liam Lawson Launches New Era for Racing Bulls with Strong Start
-
 Lifestyle4 months ago
Disney Fan Reveals Dress Code Tips for Park Visitors
-
 Health4 months ago
Walking Faster Offers Major Health Benefits for Older Adults
-
 World4 months ago
Coalition Forms to Preserve Māori Wards in Hawke’s Bay
-
 Entertainment4 months ago
Experience the Excitement of ‘Chief of War’ in Oʻahu
-
 Politics4 months ago
Scots Rally with Humor and Music to Protest Trump’s Visit
-

 Top Stories4 months ago
UK and India Finalize Trade Deal to Boost Economic Ties
-

 World4 months ago
Huntly Begins Water Pipe Flushing to Resolve Brown Water Issue
-
 Science4 months ago
New Interactive Map Reveals Wairarapa Valley’s Geological Secrets